Results matching “light meter”

What are Bumper Plates? - SttB Articles

To put on muscle and see progress at the gym you're going to need to put some weight on the bar. But what are bumper plates?

Bumper plates are a type of weight plate designed for Olympic style lifts and CrossFit movements. They are made out of dense rubber and therefore won't crack when dropped from a hip height or above, unlike standard iron plates. They usually use specific colors for each weight and there is a metal "hub" or insert" in the centre, which is about 2" in diameter so they fit perfectly on Olympic barbells.

I've used many different types of bumper plates over the years and compared dozens of variations. It really helps to build a complete home gym. So I'll show you what to look for when using a bumper plate and help you decide if they are worth it for you.

What is the point of bumper plates?


The reason for bumper plates is that they are made to be dropped. Because they are made from rubber they will not crack like iron plates. Bumpers were specifically designed for Olympic weightlifters and most CrossFit movements will need to use bumper plates instead of iron plates.

They are perfect for any movement where you drop the barbell from above the head, such as:

    Clean and snatch
    Thrusters
    Overhead squat

There are tons of companies that make bumper plates now, largely thanks to the increase in popularity in CrossFit.

It's even possible to make your own bumper plates.

But you're probably wondering...

What's the difference between bumper plates and weight plates?

Standard weight plates are made from iron. They can have a rubber or urethane coating to help protect the plate. However, they still shouldn't be dropped from above the knee as they can easily crack. Whereas bumper plates are made from dense rubber or urethane. They also use the same diameter for each weight plate, which evens the load on the plates so they can be dropped without breaking. Standard vs Bumper Plates.png Typically standard weight plates are cheaper.

However, thanks to the increasing production of bumper plates, it is possible to pick up some bargains.

Standard iron plates also often have handles (holes in the plates) to make them easier to carry.

Bumper plates do not have handles but do have a "lip" on the edge of the plates making them easier to pick up off the floor.

As iron is heavier than rubber, standard iron plates are often thinner. This allows you to fit more weight on a bar than bumper plates. This is the reason that many elite powerlifters will use iron plates. And you don't need to drop the bar from squats, bench press or deadlifts.

But there are also different types of bumper plates...

Types of bumper plates

You can buy "standard" (not the official term) or "competition" bumper plates.

Let me show you the main differences between the two...
Standard vs Competition Bumper Plates.png

Competition


The most notable difference in competition plates is the "steel hub" in the middle. This typically is a better fit than the smaller steel insert in standard bumpers. This hub is less likely to get damaged or dislodged over time from dropping the bar.

Competition bumper plates are very accurate. Often to within grams of the stated weight. Whereas a standard bumper plate can be up to 10% off the sated weight, especially if you buy a cheap brand.

Competition bumpers also use the IWF color coding for each weight (see the features section below for more on this).

Standard


These are the most common types of bumper plates you will find.

They do not have the big steel hub in the middle but use a much smaller metal insert. Good quality standard bumper plates will fit this in well. But you can find the insert gets damaged or moves after time from some cheaper brands.

Many standard bumpers are black, however, more and more color options are coming onto the market.

Features of bumper plates: What to look for


There is surprisingly a lot to look for when choosing bumper plates as you can see in the image below...

Bumper Plates Buying Guide.png

But here are the main 4 features to look for to ensure you are getting a good quality bumper plate...

Type of rubber


The main types of rubber used are:
    Rubber crumb/ recycled rubber (or high temp)
    Virgin rubber
    Urethane

Recycled rubber is usually made from shredded car tyres. Some people love these as they are super durable and "bouncy". However, they often come with a very strong smell (as in so strong you may feel sick) and are much thicker than virgin rubber or urethane.

Virgin rubber bumper plates are what we would recommend for most people. It is "fresh rubber" as in no glues, polymers or bonding agents have been added. It means the rubber is denser than high temp bumpers so you can fit more weight on the bar. It doesn't smell and it won't bounce up at you when you drop the bar.

Urethane bumper plates are the thinnest bumper plates you can buy and usually more expensive. Urethane is denser than the other rubber used to make bumpers, so there is less bounce. It does mean they are a bit louder when they are dropped than other rubber. It is also a bit shinier than virgin rubber so these bumper plates will be very bright.

Bounce/ durometer rating


The Shore Durometer rating was invented by Albert Ferdinand Shore. It measures how hard the rubber is out of 100. The higher the number the harder the bumper plates are. This means there will be less bounce and are typically more durable. It does also mean they make more noise when you drop them.

Typically I look for a durometer rating of 85 or above, otherwise they can be too bouncy, which can actually end up causing more damage to you or other equipment.

What diameter are bumper plates?


All bumper plates are 450mm (17.7") in diameter. The lighter plates such as 10-15 lbs can be slightly smaller in diameter depending on the brand you buy from. There are two main benefits of having this uniform diameter:

    Spreads the force of the impact across a larger surface area, meaning your bumpers or floor are less likely to get damaged It helps with certain exercises having a larger and lighter weight, such as barbell hip thrusters.

Color coding

Many bumper plates use the IWF color coding:
    Red = 55lb/25kg

    Blue = 45lb/20kg

    Yellow = 35lb/15kg

    Green = 25lb/10kg

    15lb/10lb = vary


There are a couple of benefits of using color:
    It looks cool
    It helps to see how much weight you have on the bar quickly

Monday, 11 Jun 2018 - Issues

I'm constantly amazed at just how much my training is influenced by the people on this site. Whether you're looking for a new piece of equipment, an unusual exercise variation or just an idea of how others approach things, you'll enjoy these :

Over to you. I'd love to hear what you think : leave your comments on the above articles, and share them with your friends/colleagues/clients and so on.

NB : If you're keen to do a little fitness writing and would like to submit your own piece for Straight to the Bar, get in touch.


Video : Everything You Ever Wanted to Know About Fasting (Jimmy Moore on Health Theory)


Very interesting discussion with Jimmy Moore on fasting, low-carb diets and nutrition in general.


Gymchat 278 - TBA

We're still finalising the details for this week's discussion. I'll post them on the blog (and Twitter, Google+ etc) shortly.

In the meantime, take a look at some of the previous episodes of the show - (there's an example below, and a full list here). And if you've got any questions or comments on the various topics discussed, we'd love to hear them. Just leave a note below the video.


Previously : In Gymchat 149 we discussed Getting Started with Personal Trainer, Martial Artist and Strength Coach Christopher Smith. Great conversation.


If you missed the live stream (or just want to go over a particular point again), you can see the entire transcript here.

NB : if you'd like to take part in a future episode - either as an interviewee, or as a guest host - just drop us a line. Love hearing how everyone else trains.

Tip of the Week: Dynamic Thumb Training with the Titan's Telegraph Key

Each week we publish a number of tips and techniques via Twitter, Google+, the blog; and now the newsletter. Wherever you are, there's always a way to improve what you're doing.


TTK
TTK.
I love a dose of grip work; it's a great way to challenge yourself. It's also a particularly fun way to train.

Still, there's always a different way of looking at things. Here's an excellent example of that - Jedd shows just how a piece of equipment like the TTK can be put to a slightly uncommon use. I'll let him explain.

From the article Getting the Most out of Your TTK :

Thumb training can be broken up into at least four different types: Dynamic, Static, and Extensor, and Multi-Planar.

The focus of this article will be Dynamic thumb training with the Titan's Telegraph Key, or TTK.

One way to mix things up a bit is to make the Range of Motion longer by adding something underneath the finger-side handle. A catalog is a perfect choice for this. This makes the hand work through a longer range of motion the muscles are not used to. The first time I did this, I was sore for several days from the new stimulus. This technique has worked great for me in my quest for lifting heavier and wider block weights.

A brief demonstration :


Love it.


Checking Out : The iQsquare Cycling Power Meter

Looks great.

The iQsquare Cycling Power Meter is a feature-rich, relatively low cost (for Power Meters, that is) device for professional and serious amateur cyclists alike. Available in November this year, the video below will show you exactly what's on offer :
:


The iQsquare Cycling Power Meter.


Quick update on the Hip Thruster we mentioned recently - fantastic thing.

Rather than trying to explain how it works, here it is in action :


Good stuff Bret, looks great.

Monday, 22 Sep 2014 - Issues

I'm constantly amazed at just how much my training is influenced by the people on this site. Whether you're looking for a new piece of equipment, an unusual exercise variation or just an idea of how others approach things, you'll enjoy these :

Over to you. I'd love to hear what you think : leave your comments on the above articles, and share them with your friends/colleagues/clients and so on.
NB : If you're keen to do more writing in 2014 and would like to submit your own piece for Straight to the Bar, here's how.


Video : Ascending Pull Up Ladder

Great exercise, and an interesting bit of technique fine-tuning. Nice one.


Gymchat 258 - Fitness Business Strategies (Matt Palfrey)

If you've been involved with the fitness industry for any length of time, chances are you've thought about setting up your own gym. Perhaps you've already got one.

Either way - how do you promote it? Attract new customers? Learn about what works, and what doesn't?


This week we'll be discussing this area in detail, answering all of the above and a whole lot more. Joining us is Strength & Conditioning Coach Matt Palfrey, together with Personal Trainer (and Strength Athlete) Josh Hewett. Fantastic.


NB : We'd love to hear your questions and comments. If there's a particular subject you'd like Matt and Josh to address, just swing by the event page for this Gymchat and leave a comment or jump in the Hangout and ask it directly.

And if you'd like to point your friends/colleagues to the discussion, just use the 'share' button at the top of that page. The more the merrier.


Details -

Who : Strength & Conditioning Coach Matt Palfrey, Personal Trainer and Strength Athlete Josh Hewett, and You
Topic : Fitness Business Strategies
When : Monday Sep 22, 8:00pm EDT (the Event page shows what time that is in your local timezone).
How : Watch the live stream, join the hangout (just add Top Form Fitness to one of your circles, and Josh'll send out the URL when the Hangout starts), or jump in the Q&A on the Event page itself. We'll also post the full video on the main site shortly after the Gymchat.


Previously : In Gymchat 257 we discussed Muscle Activation Techniques (with Core Strength's Eric Seifert and Personal Trainer and Strength Athlete Josh Hewett). Great conversation.

If you missed the live stream (or just want to go over a particular point again), you can watch the entire video here.


Tip of the Week: Getting Back Into It

Each week we publish a number of tips and techniques via Twitter, Google+, the blog; and now the newsletter. Wherever you are, there's always a way to improve what you're doing.


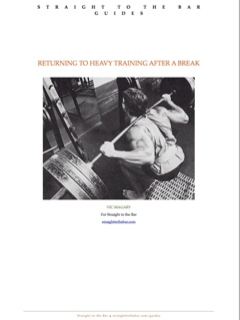
Returning to Heavy Training After a Break
If you've been away from the iron for a while, how do you get back into it?
Vic takes a thorough look at this in the 'Returning to Heavy Training After a Break' ebook. For a brief overview though, check out the discussion we held on that very same topic.


In Gymchat 136 - Heavy Training after a Break, Vic noted :

I lost a LOT of strength on some lifts. It was surprising. That's why that initial 3 weeks of lighter work was important to me - it was smart to underestimate my strength at first.

And

It's important to consciously do less those first few weeks. I was off for almost 2 years - as a rule I did not put any more than 135lbs on the bar the first week. I did not push any sets to failure the next two weeks while still staying at 5 reps or less for most sets.

Good stuff.


Checking Out : StrongerGrip BandGrips Handle and StrongerGrip BandAnchor

Fantastic.

Ryan goes into a bit more detail over on the Strongergrip Blog, but in short : you'll want these. Beautifully simple idea.


These will be available in a couple of days. In the meantime, the pre-order page briefly explains what they are :

It is a handle that conveniently allows a resistance band to attach and a 1-1/8" diameter handle to pull. The handle also is perfect size for FatGripz and other thick grip sleeves.

StrongerGrip BandGrips. Beautiful.


Quick update on the Hip Thruster we mentioned recently - fantastic thing.

Rather than trying to explain how it works, here it is in action :

Good stuff Bret, looks great.

Monday, 13 Aug 2012 - Issues

This Week on Straight to the Bar

I'm constantly amazed at just how much my training is influenced by the people on this site. Whether you're looking for a new piece of equipment, an unusual exercise variation or just an idea of how others approach things, you'll enjoy these :

Over to you. I'd love to hear what you think : leave your comments on the above articles, and share them with your friends/colleagues/clients and so on.

NB : If you'd like to submit your own piece for Straight to the Bar, here's how.


Video : Assisted Band Training Workout

Ready for a solid outdoor workout, but your strength's not quite where you'd like it to be yet? Consider something like this.

Nice one Dave.

btw, if you want to try something like this yourself, all you need is a light band or two. These are ideal.


Gymchat 182 - Exercise and Aging

As we live longer and longer, the active part of that - the healthspan, if you like - also grows.

One of the outcomes from this is that people are now beginning their own strength-training journeys at a variety of ages - it's entirely reasonable to begin at age 8 or 80; or anything inbetween.


This week we're taking a close look this 'training at any age' philosophy. If you're already in your 50s/70s/90s or beyond, how do you start? What sorts of things should you - and could you - be doing?

And for those of us that haven't quite reached those points yet, how do we make sure we're still ready for the heavy stuff when we get there?

Helping us explore this fascinating topic is none other than Personal Trainer Kirk Fontaine. Fantastic.


Details -

Who : Personal Trainer Kirk Fontaine
Topic : Exercise and Aging
When : Wed Aug 15, 9pm EDT (here's how to find out when that is in your timezone)
How : Post a comment, question or reply
Link : https://plus.google.com/u/0/113406428532094481598/posts/7483jTr37Eu

For everyone who's joining us for their first Gymchat, welcome. Just dive right in, and ask Kirk any training-related questions you like.

See you there.


Quick update on last week's gymchat : Once again, sincerest apologies for this - we've unfortunately had to reschedule this one. The new date will be announced shortly.

Tip of the Week: Nails - Converting Imperial to Metric

Each week we publish a number of tips and techniques via twitter, Google+, the forums, the blog; and now the newsletter. Wherever you are, there's always a way to improve what you're doing.


150mm (6
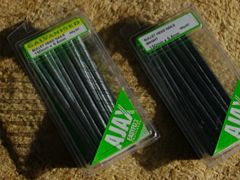
150mm (6") Nails.
When it comes to incredibly enjoyable ways to train, bending things is certainly high on the list. I love wandering around hardware stores in any case, and always seem to end up in the 'nails and fasteners' area.

Love it.


The first time I did that however (well, the first time after Jedd suggested I try a little nail-bending), I was in for a bit of a shock. The days of Imperial -> Metric conversion charts were gone, and the nail sizes were all noted in millimetres.

If - like me - you're looking to go the other way (I learnt a number of core concepts from friends in the US, and Imperial measurements were everywhere), the following might help. From the article Nails : Converting Imperial to Metric, a couple of tables that may come in handy :


Nail Shank Gauges
Gauge sizes Decimal inches Decimal Millimeters
18 .049 1.24
16 .065 1.65
15 .072 1.83
14 .083 2.10
13 .095 2.41
12 .109 2.76
11 .120 3.04
10 .134 3.40
9 .148 3.76
8 .165 4.19
7 .175 4.44
6 .203 5.15
4 .238 6.04
Nail Lengths
Nail Penny sizes In fractions of inches In millimetres
2d 1 25.4
3d 1 ¼ 31.8
4d 1 ½ 38.1
5d 1 ¾ 44.5
6d 2 50.8
7d 2 ¼ 57.2
8d 2 3/8 or 2 ½ 60.3 or 63.5
9d 2 ¾ 69.9
10d 3 76.2
12d 3 ¼ 82.5
16d 3 ½ 88.9
20d 4 101.6
30d 4 ½ 114.3
40d 5 127.0
60d 6 152.4
70d 7 177.8
80d 8 203.2
90d 9 228.6
100d 10 254.0
Enjoy.


Checking Out : Primal Stress

This looks superb.

If you checked out the Resilience Breathing offering we noted recently, you've already got an idea of what's in store with the complete Primal Stress package. Suffice to say that it's comprehensive.


What's it all about? Over on the main site, Tanya explains it beautifully :

Scott Sonnon's revolutionary new work Primal Stress clearly and comprehensively explains the impact of stress on the body, and how not only to offset but to optimize it in order to build the best possible life that you can. If you suffer any symptoms due to excessive stress from your job or your lifestyle (and who doesn't?) you need this book. Even if you don't think that you suffer due to inordinate stress, you need this book. Basically, if you have a body, you need this book. What you learn from it can change everything.


Perfect.


Quick update on the superb Fixing Elbow Pain we mentioned recently. There's a full review here, but suffice to say that if you've ever experienced conditions like Tennis Elbow or Golfer's Elbow, it's essential reading.

Love it.

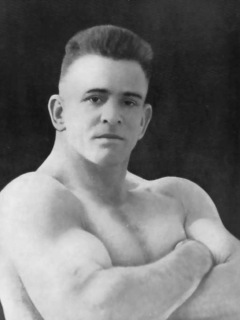
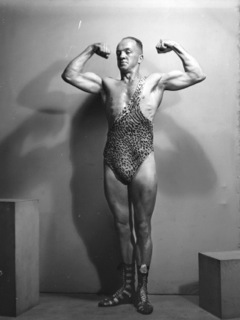
Don Athaldo as pictured in Health, Strength & Muscular Power
Don Athaldo as pictured in Health, Strength & Muscular Power.
Walter Joseph Lyons (better known as Don Athaldo) was an Australian Circus Strongman in the 1920s and 1930s. Although he published several books, it was his The Athalding System mail-order offering that helped give him lasting fame.
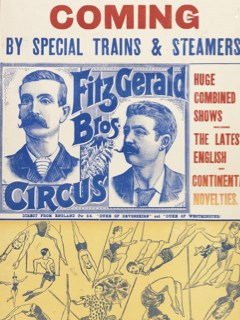
Poster for Fitzgerald Bros' Circus
Poster for Fitzgerald Bros' Circus.
Lyons was born to Queensland carpenter Frederick Horace George Lyons and his wife Elizabeth on 26 November 1894 at Condobolin, New South Wales [1, 7]. Named Walter Joseph, he was constantly ill, asthmatic [9] and could not walk well until aged 5. At Fitzgerald Bros' Circus he saw the strongman 'Dr Gordon', became inspired and began reading about ancient Greece and taking correspondence courses in physical culture to build himself up [1].
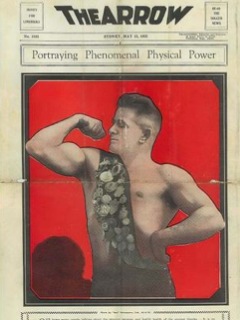
Promotional flyer from The Arrow, May 13 1932
Promotional flyer from The Arrow, May 13 1932. State Library of Victoria.
Apprenticed to a blacksmith for five years, in 1915-16 he served as a shoeing-smith corporal with the Australian Naval and Military Expeditionary Force at Rabaul, New Britain. In 1916-17 he twice enlisted in the Australian Imperial Force, only to be discharged both times as medically unfit. Rejoining the A.N. and M.E.F. in November 1917, he returned as a shoeing-smith corporal to Rabaul where, after briefly being discharged in 1919, he served until 1921. On 22 August that year he married Vera Elizabeth Stewart at the Warren Methodist Church, Marrickville (a Sydney suburb) [7]. He resumed blacksmithing at Leichhardt (also a Sydney suburb), as well as becoming involved in numerous sports (he boxed for a time as a light-welterweight).
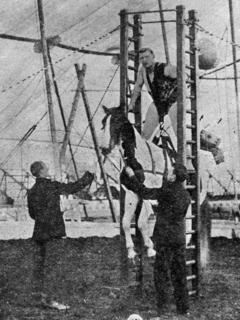
Horse Lifting (using harness lift technique)
Herr Pagel demonstrating the Horse Lift (using harness lift technique) in 1903. Athaldo used the same method almost 30 years later.
Adopting the name 'Don Athaldo' (*), he won acclaim as a circus strongman; cementing his reputation through spectacular demonstrations of strength and a flair for showmanship. Among his best-known feats were the Human Link, Bending & Scrolling, and Horse-Lifting (involving a harness lift of sorts). Topping the list : pulling a touring car with six passengers an incredible 805m (more than half a mile) up the hill of William Street, Sydney. If you've ever run the Sydney City to Surf half marathon, you know this hill. Insanely steep.
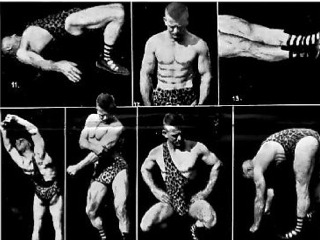
Various exercises from The Athalding System
Various exercises from The Athalding System.
In 1932 he authored Health, Strength & Muscular Power, a booklet detailing his Athalding System [3]. This was followed in the early 1940s by Meet Don Athaldo and Muscular Strength. In the early 1950s he wrote The Athalding Course, a 3-part series of lessons detailing his own approach to training and nutrition [3]. Heavily influenced by Charles Atlas' Dynamic Tension course [4], it was Athaldo's The Athalding Course that helped cement his long-term fame.


Athaldo's philosophy combined the idealized man of action with ideals of health, masculine beauty and virility. Rejecting the notion of 'abnormal development' fostered by weight-lifting, he stressed diet, fresh air and 'dynamic tension'. 'The Athalding System', he claimed, would overcome bad breath, bad habits, cancer, stammering, brain fag, virile weakness and pimples, while developing a pleasing personality and the Oriental secret of calmness [1].

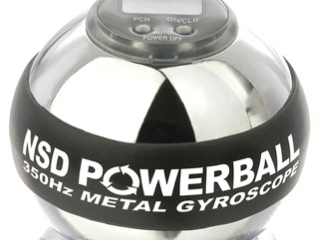
Review : NSD Powerball - SttB Articles

First question you may have is what are NSD Powerballs?? Well the NSD Powerball is a revolutionary new Gyroscope which literally explodes with mind numbing inertial forces once you activate its internal rotor!

Now when I first read about the NSD Powerballs and their promises of everything from joint rehab to building powerful hands and wrist I was a little skeptical. I mean really? As a Professional Armwrestler I found it hard to believe that I was going to feel anything more then a little Sunday afternoon forearm pump, but like many non-mainstream sports athletes I'm game to give almost anything a try if it means sports improvement. So I bought a couple NSD Powerballs and here are my reviews.

I started out with the 250Hz Powerball with the speed counter. The 250Hz is a plastic lightweight gyro that is easy to start with the starter cord or thumb start (once I saw a "how to" video on YouTube). Happy to say the forearm pump was fast and my hands & wrists got a really good workout after just a couple sets. The speed meter (to measure your rpm) attached on top made the workout a lot of fun because I kept on trying to top my high RPM score (some addiction there lol). The 250 Hz is the kind of powerball you can use a lot and almost everyday as it gives you the perfect low impact workout. At $40 it's a bargain for the kind of workout you'll get again and again.

Next up is the 350Hz lightweight metal powerball, aka "The Raptor". The raptor shows up in a beautiful protective case, extra parts, and some fun goodies. The Raptor reminds me of the movie Jurassic Park when the old guy says "nothing but the best" because it's amazing. Gold plated, computer balanced so it runs smooth and is the fastest Gyro on the planet. (The world record is 20,090 rpms by Akis Kritsinelis). Even with my years of hand and wrist training just hitting 15k was a mega workout, burning up my forearms in minutes. At $190 the Raptor is a little pricey so it may not be your first NSD choice but after trying some of the other products you'll be putting the Raptor on your Christmas list.

There are many benefits to bending steel.

First off, bending steel is extremely fun. Many athletes who take up bending literally become obsessed with it and bend multiple times a week.

Another benefit from bending steel is the physical result of bigger and stronger muscles. Straining against the steel requires a great deal of time under tension which results in increased strength and bigger muscles, especially in the upper and lower arms.


Next, bending increases your mental toughness. While the first couple of times you bend you may fail at a particular attempt, if you resolve to focus mentally and continue to hone your ability to do this, after a short time your mental toughness will enable you to blow past previous plateaus and climb the bending ladder.

Finally, there are certification systems out there that you can strive for and get recognition and your name 'up in lights' for the efforts you put into bending. Unfortunately, jumping right to the steel that you get certified on can leave you highly disappointed and possibly even injured.

This article serves as a guide of how to get started with bending and how to gradually climb the ladder safely and steadily.

TYPES OF STEEL TO BEND

There are a lot of options out there for you to start bending. Getting started can be as easy as heading to the hardware store. This is what you can pick up when you go there to get some beginner level nails to bend

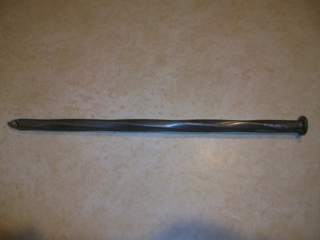
Coiled Nails: Many nails are not straight the whole way down their shaft, but rather have a coiled design to them.

This coil makes the shaft of the nail thinner and less strength is required to bend them, a great option for people starting out with bending.
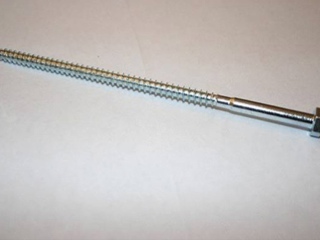
Ungraded Bolts & Screws: There are many different types of ungraded bolts and screws at hardware stores. Lag screws are one example, pictured here. Take a tape measure with you to the store and look for screws and bolts that are about 6 inches long 1/4 inch in diameter, more or less. These should be good selections for beginning benders.
One thing to take note with bending bolts and screws is that if they are threaded in the middle of the shaft, they will be easier to bend. Try to find un-threaded ones if you can for a more easily predictable bend, other wise you may want to go with a thicker diameter.
Rack-Mounted Wrist Roller
Rack-Mounted Wrist Roller.
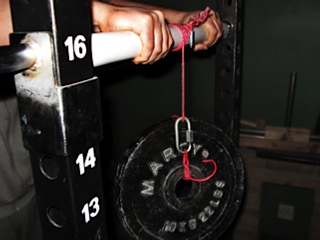
The Wrist-Roller is a classic piece of gym equipment, and rightfully so - it's a great way to strengthen and develop the muscles of the hand, wrist and forearm. The standard model of Wrist-roller involves a short bar connected to a rope or cord, which attaches to the weight. The bar is held either in front of the user - which usually results in the shoulders tiring long before the forearms and wrist - or with arms straight down whilst standing on benches or boxes to allow the rope to hang down. The problem with the 'free-standing' design is that you have to support the bar throughout the set, severely limiting the weight that can be used, as well as leaving the forearms under worked.

In the last few years the 'mounted' wrist-roller has appeared and offers a solution. Usually consisting of a bar which can slide over a barbell or a pin in a power-rack, it takes out the supporting element of wrist-rolling and lets you really hammer your lower arms.

The downside? Cost.

This doesn't have to be a problem though - here's a guide to making your very own power-rack mounted wrist-roller:

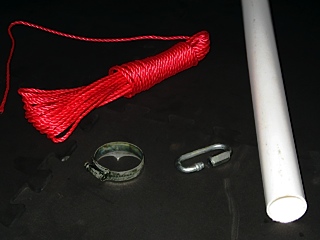
What you'll need :

Wrist Roller Parts
Wrist Roller Parts.
  • PVC pipe (any diameter)
  • Hose clamp (to fit PVC pipe)
  • Rope/Cord (4 - 5 feet)
  • Carabiner or Quick-Link Connector
  • Hack Saw to cut PVC pipe
  • Loading Pin (optional)

    • Step-by Step :

      1. The first thing you'll need to do is measure the space in which the roller will be used. The PVC pipe should be cut slightly shorter than the space so it fits without getting stuck - a one or two inch gap each side will be plenty.
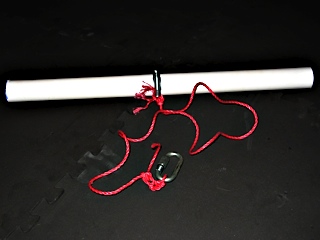
      2. Next you will slide the hose clamp into the middle of the pipe and thread about 6" of your rope or cord between the hose clamp and the PVC. Tighten up the hose clamp then tie a couple of knots in the cord for a bit of extra security.
      3. Completed wrist roller
        Completed wrist roller.
      4. The rope should be cut to about 4 or 5 feet and the end will be knotted securely around the carabiner or quick-link connector (pictured).
      5. Hold the pipe between the uprights in the power-rack and slide the pin through. You can vary the height you use to hit the lower arms differently - somewhere around chest height is probably the strongest position.
      6. Attach weight by running the carabiner through the hole of a weight plate or the handle of a kettlebell and snapping it over the other side of the rope. You could also attach the connector to a loading pin for even quicker weight change.
      7. Now you can roll away until your forearms are on fire - and when you're done just detach the weight, slide out the pin and throw the roller in your gym bag!
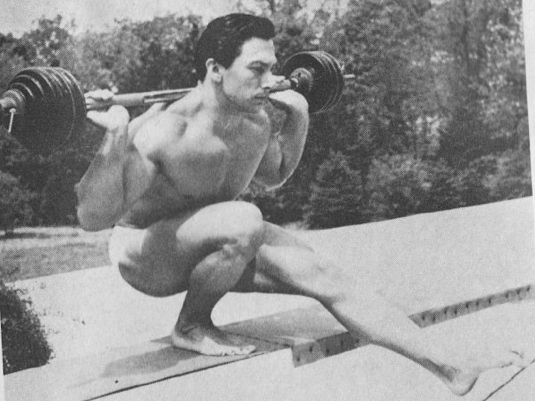
Single-leg Squat
Nice and deep.
A brilliant week here on Straight to the Bar. The highlights :
Crushing down a nail at a Grip Contest
If you are a person who puts time in at the gym, probably one of the last things that has ever crossed your mind is nail bending. Who the hell ever heard of nail bending? Actually, nail bending is one facet of an underground strength community called Hand Strength Training, or Grip Training. If you are looking for something to spice up your training routine, nail bending might just be the thing for you. Let's take a look at several of the benefits nail bending can bring you.

1. Forearm size

Nail Bending involves a great deal of tension in the hands, wrists and forearms which leads to major forearm muscle development, especially in the extensors of the forearm. Often, forearm work at the gym involves movements like wrist curls and other simple variations. While these exercises bring about results, many times there is a lack of development in the muscles in the back of the forearm. The sustained tension of nail bending causes growth in both the flexor side of the forearm and the extensor side of the forearm, creating an impressive look of balance and control. The top nail benders' forearms resemble the forearms of the top arm wrestlers - marked by thick, rugged and cord-like musculature.

2. Mental and Physical Toughness

Nail bending involves taking a perfectly good nail and twisting it into a shape that makes it completely useless for any of its normal industrial applications. You're doing something that was never meant to be done, and to do this requires you to focus all of your strength and your mental power into the bend. A lack of commitment from either end of the spectrum will end up in your inability to finish up the bend. When you become proficient in harnessing your mind's and your body's power in nail bending, imagine the results you will see in your other lifts or in the sport you play. You'll be unstoppable!

3. Coordination of the Kinetic Chain

Nail bending isn't just an exercise of the lower arms. If you try to bend a nail by tensing only the hands, wrists and forearms, you stand the chance of failing miserably. The best nail benders are able to coordinate the effort of the entire core and torso and radiate this exertion throughout the kinetic chain - from the core, through the torso, into the shoulders and down through their arms, forearms and hands. As I have said many times, you don't bend nails with your hands, you bend them with your entire upper body! This coordination of the kinetic chain will carry over to other lifts, even the bench press, which when done correctly involves major synchronization between all of the musculature in the upper body.

4. Sporting Implement Power and Control

Many sports involve some sort of stick, bat or other implement: baseball, racquetball, tennis, hockey, lacrosse, etc. The strength built from nail bending will translate very well into these sports. You will notice an increase in power resulting in everything from longer drives on the golf course to a stronger back hand on the tennis court. Being selective at the plate will be easier because you'll be able to pull that bat back when you realize that curveball is headed for the dirt, and your slap shots will scare all the goalies you run into on the ice.

5. Impress Your Friends

Nail bending is NOT some form of trickery or slight of hand like magic is. However, it DOES bring about much the same reaction from a crowd. Imagine talking about this new sort of strength training you are doing and when they ask you to show them, you bust out a nail, wrap it in a towel and bend it right before their eyes. How impressive will that be!

6. Get Your Name "Up in Lights"

Nail bending has been growing in popularity exponentially in the last 5 years. There are now two separate certification systems for nail bending. The first to come in existence is the IronMind Red Nail Roster, located HERE.

IronMind, Inc. is one of the pioneers in grip strength products and they offer a variety of nails that athletes can purchase and bend. These "nails" are actually a variety of lengths and diameters of cold rolled steel stock. Their biggest piece is what the call the Red Nail, a 7-inch long, 5/16-inch thick piece of evil. If you bend it using IronMind's wraps into a U-shape in less than a minute, you get your name featured on their certification list. If you click on the link, you'll see that I certified in 2007.

The other major nail bending certification is organized by John Beatty's Fat Bastard Barbell Company.
They feature a host of lists for which one can certify. Their equivalent to the Red Nail is the Bastard Nail. Bend their 7-inch by 5/16-inch stock and you garner the title of Certified Bastard! And that is just the beginning. They also feature lists for bending stainless steel stock (Shiny Bastard) and Hexagonal Stock (Hexabastard) among others!

7. Fun

The best thing about nail bending is that it is good pure fun. You are able to test yourself and see improvement in your technique and strength while seeing increases in confidence and mental edge. You can crank up the music and go for a new personal best. Over the course of time, all of the nails, bolts, and stock you bend can be saved for posterity. You can see how you progressed over the years. One day, you'll be able to tell your grand kids about when you first dominated the 60-penny nail or the grade-5 bolt. And maybe you can even log them onto IronMind.com or FatBastardBarbellCo.com and show them the certifications you were able to acquire.

In short, nail bending is one of the most exciting parts of the sport of Grip Strength. For me, the physical and the mental benefits I have seen from nail bending are outstanding, not to mention the friendships I have made with some of the top nail benders in the United States and around the world. I encourage you to try your hand at nail bending.

Read up on Nail Bending more here at Straight to the Bar and these other excellent resources:

Diesel Nail Bending eBook - The most complete bending reference on the net.
DieselCrew.com - Our site is loaded with information on Nail Bending and Grip Strength
Gripboard.com - This is THE message board for info on anything related to Grip Strength
My Blog - Stay up to date on the goings-on around the Grip World at my Blog.

NAPALM JEDD JOHNSON

2 3  

Pages

Powered by Movable Type 5.2.7